How to Make an Easy Advent Calendar Diy
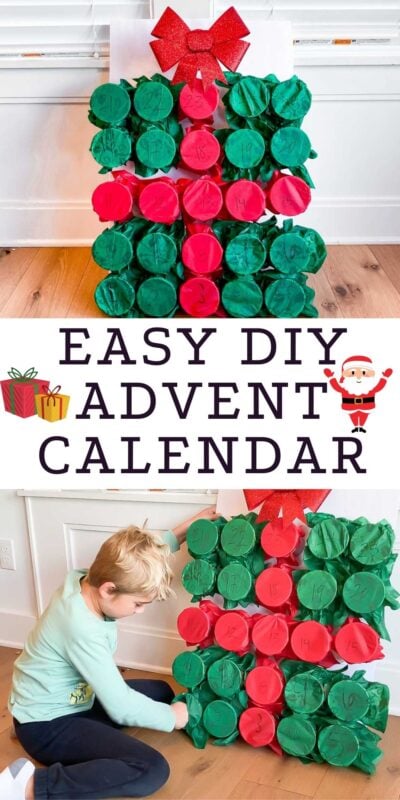
This easy to make DIY advent calendar is the perfect way to make a custom advent calendar for anyone you want! It's great for any age and the best part is you can fill the cups with whatever gifts would work well for the recipient! Or forget the gifts and make it a Christmas activity calendar instead!
A few weeks ago I shared this Grinch Christmas punch game on TikTok and it went absolutely viral with people loving the idea.
A lot of people commented on the video asking me to make a DIY Christmas advent calendar with the same method, so I did!
And I kind of love how it turned out!
The best part is that you can customize your DIY advent calendar with whatever colors you want plus fill the cups with whatever gifts or activities you think would be best for the person you're giving this to!
This is a step by step guide on how to make a fun Christmas countdown calendar with just some plastic cups, tissue paper, and hot glue!
But first, let's chat real fast about what an advent calendar is in case you're not familiar.
What is an advent calendar?
An advent calendar is basically a fun way of counting down the days until something. The most popular time of year for advent calendars is the holidays, Christmas in particular, as people count down the days up until December 25th.
Advent calendars typically have some sort of box, window, bag, or in this case plastic cup where you get to open it up and get a surprise for that day. sometimes it's a chocolate treat, sometimes it's a toy, and sometimes it's an activity to do with the family!
There are a ton of store-bought advent calendars you can purchase (I bought this one for my son already!) that are all ready put together, but I love making my own because you can customize what goes inside and personalize it to the recipient!
So I'm going to show you how to make this fun DIY advent calendar where instead of just opening a window each day, you get to punch through tissue paper to pull out your surprise!
DIY Advent Calendar Supplies

Supply Notes
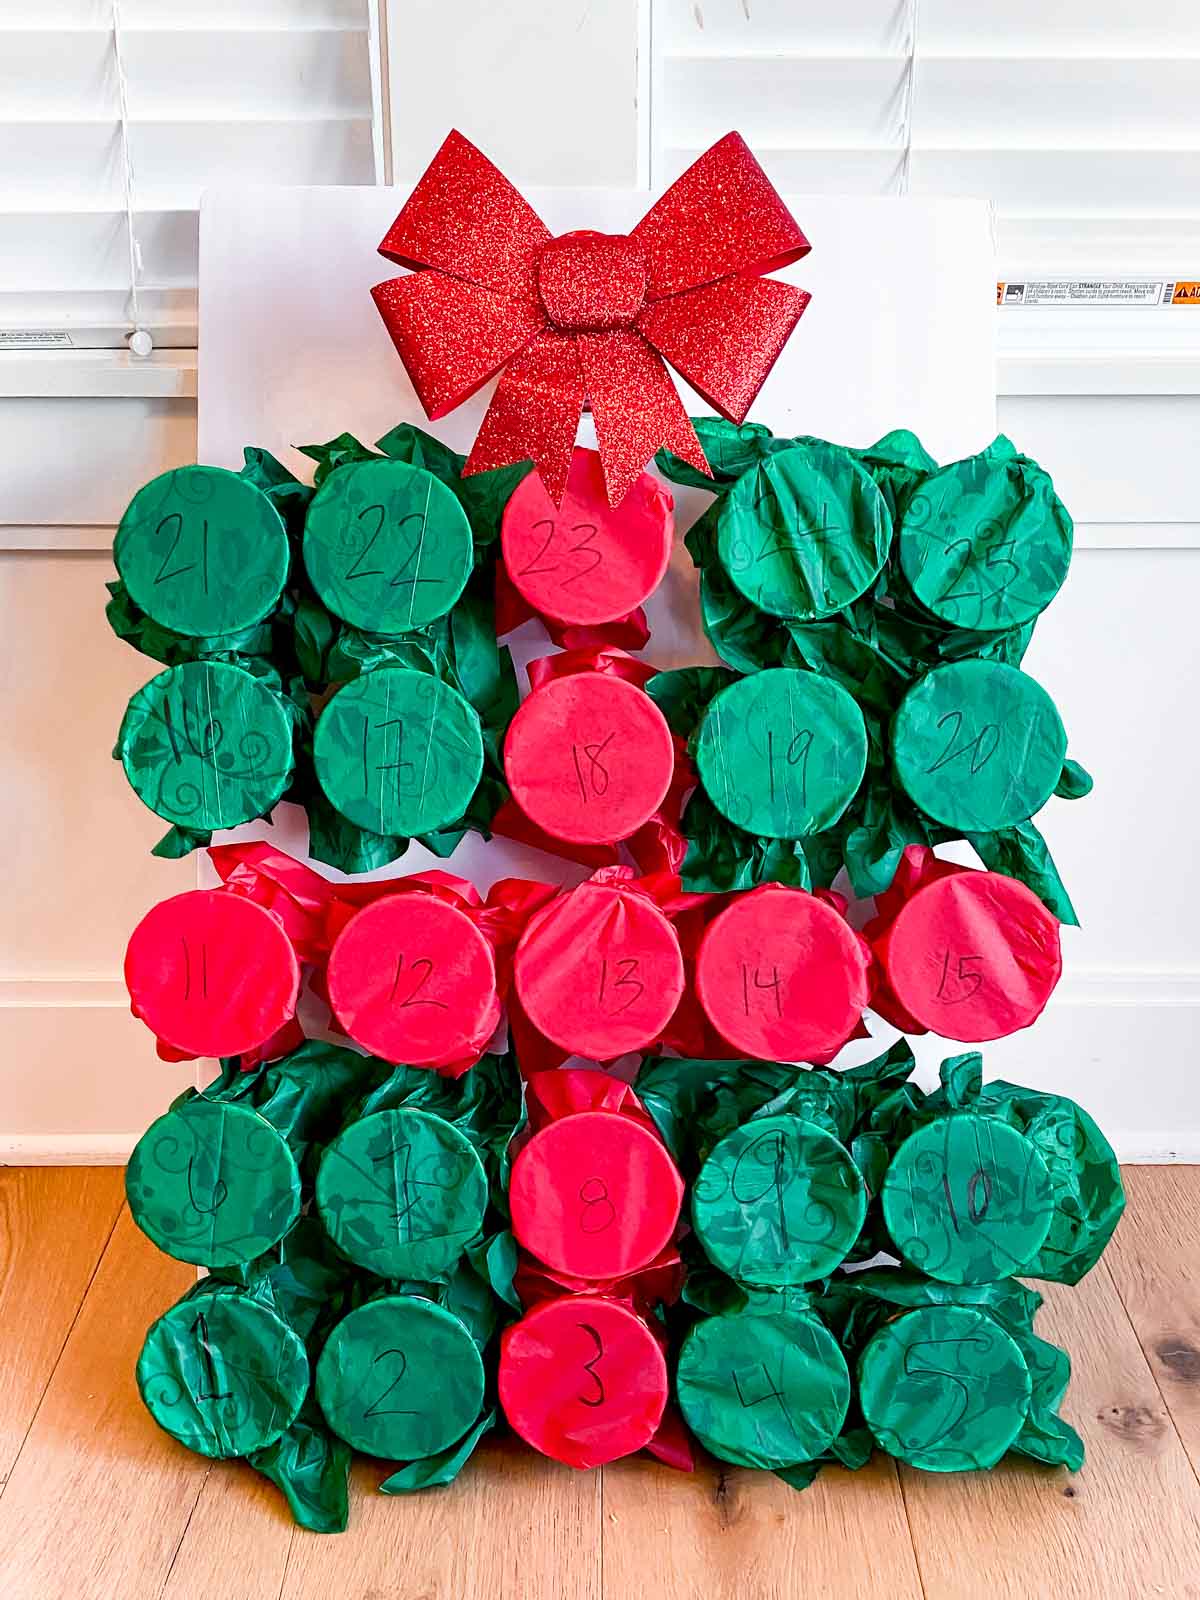
I've included links to the actual supplies I used. I made my advent calendar look like a wrapped present with red and green tissue paper but you could totally do something else like a Christmas tree shape instead!
- Plastic cups – any color works since you'll be covering them up, but I personally used red leftover from this Halloween punch board! You could also use paper cups as well, just make sure they're large enough to hold things!
- Tissue paper – just like with the cups, any color works. If you want to make it look like a present, I recommend two contrasting colors.
- Rubber bands – any rubber bands work, just make sure they're big enough to fit around the cups. I also recommend if you can get them, the thinner ones over the thicker ones. They just fit around the cups better!
- Foam board – I just grabbed a white foam board from Dollar Tree to make my board. It's not the sturdiest but works for my purposes!
- Large bow – I grabbed a large bow at Dollar Tree to add to the top of my advent calendar, it just wasn't a complete present without the bow on top!
The last thing you'll need are things to put inside the cups. I've included a huge section at the bottom of this post with ideas for DIY advent calendar gift ideas!
How to Make a DIY Advent Calendar
This is a fun and creative way to count down the days until Christmas! I've included a tutorial below on how to make this advent calendar as well as some ideas on what to put inside the cups!
There are so many different variations you could try depending on who it's for, and I've included some of my favorite ways to use it below! Oh and don't think this is just for kids, this would make a great advent calendar for anyone!
Oh and p.s., make room in your storage room or garage for this because you can reuse it over and over again by simply refilling with gifts and replacing the tissue paper!
Tip!
If you have more than one person, I recommend making an advent calendar for each kid unless they're old enough to not be upset if they don't get to punch the cup for the surprise every day!
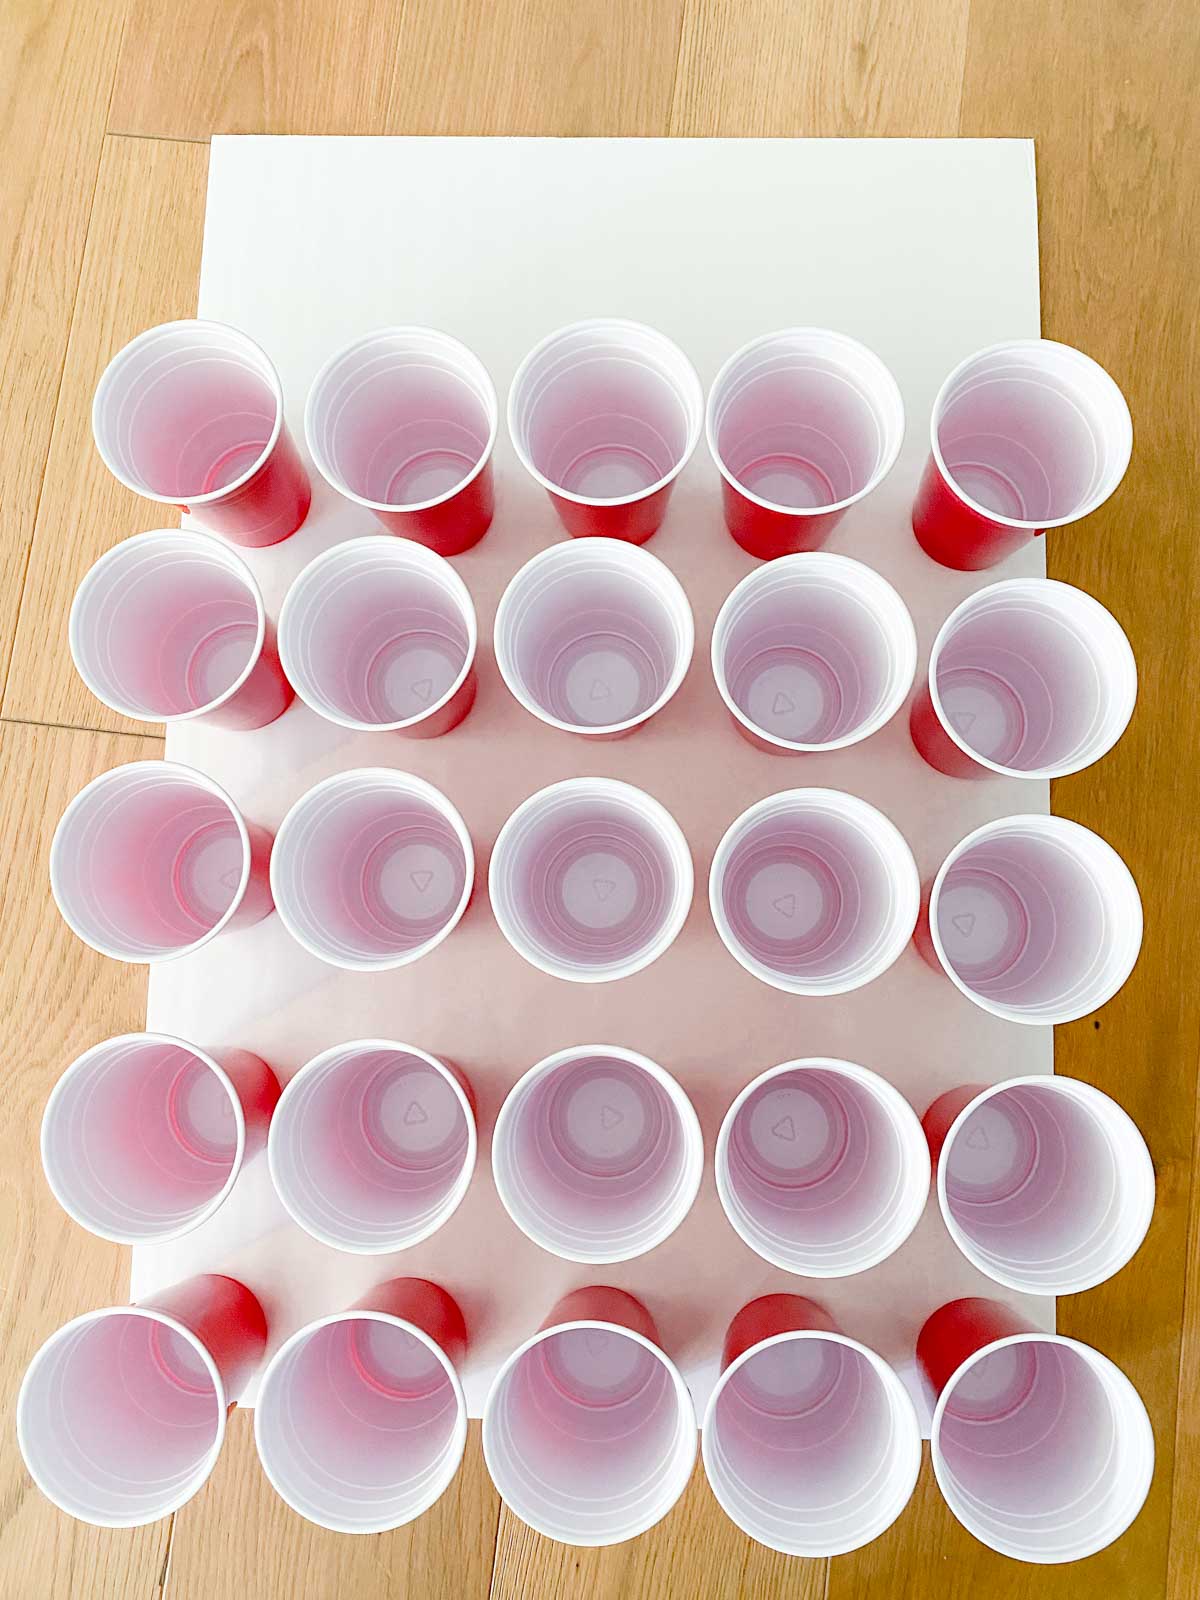
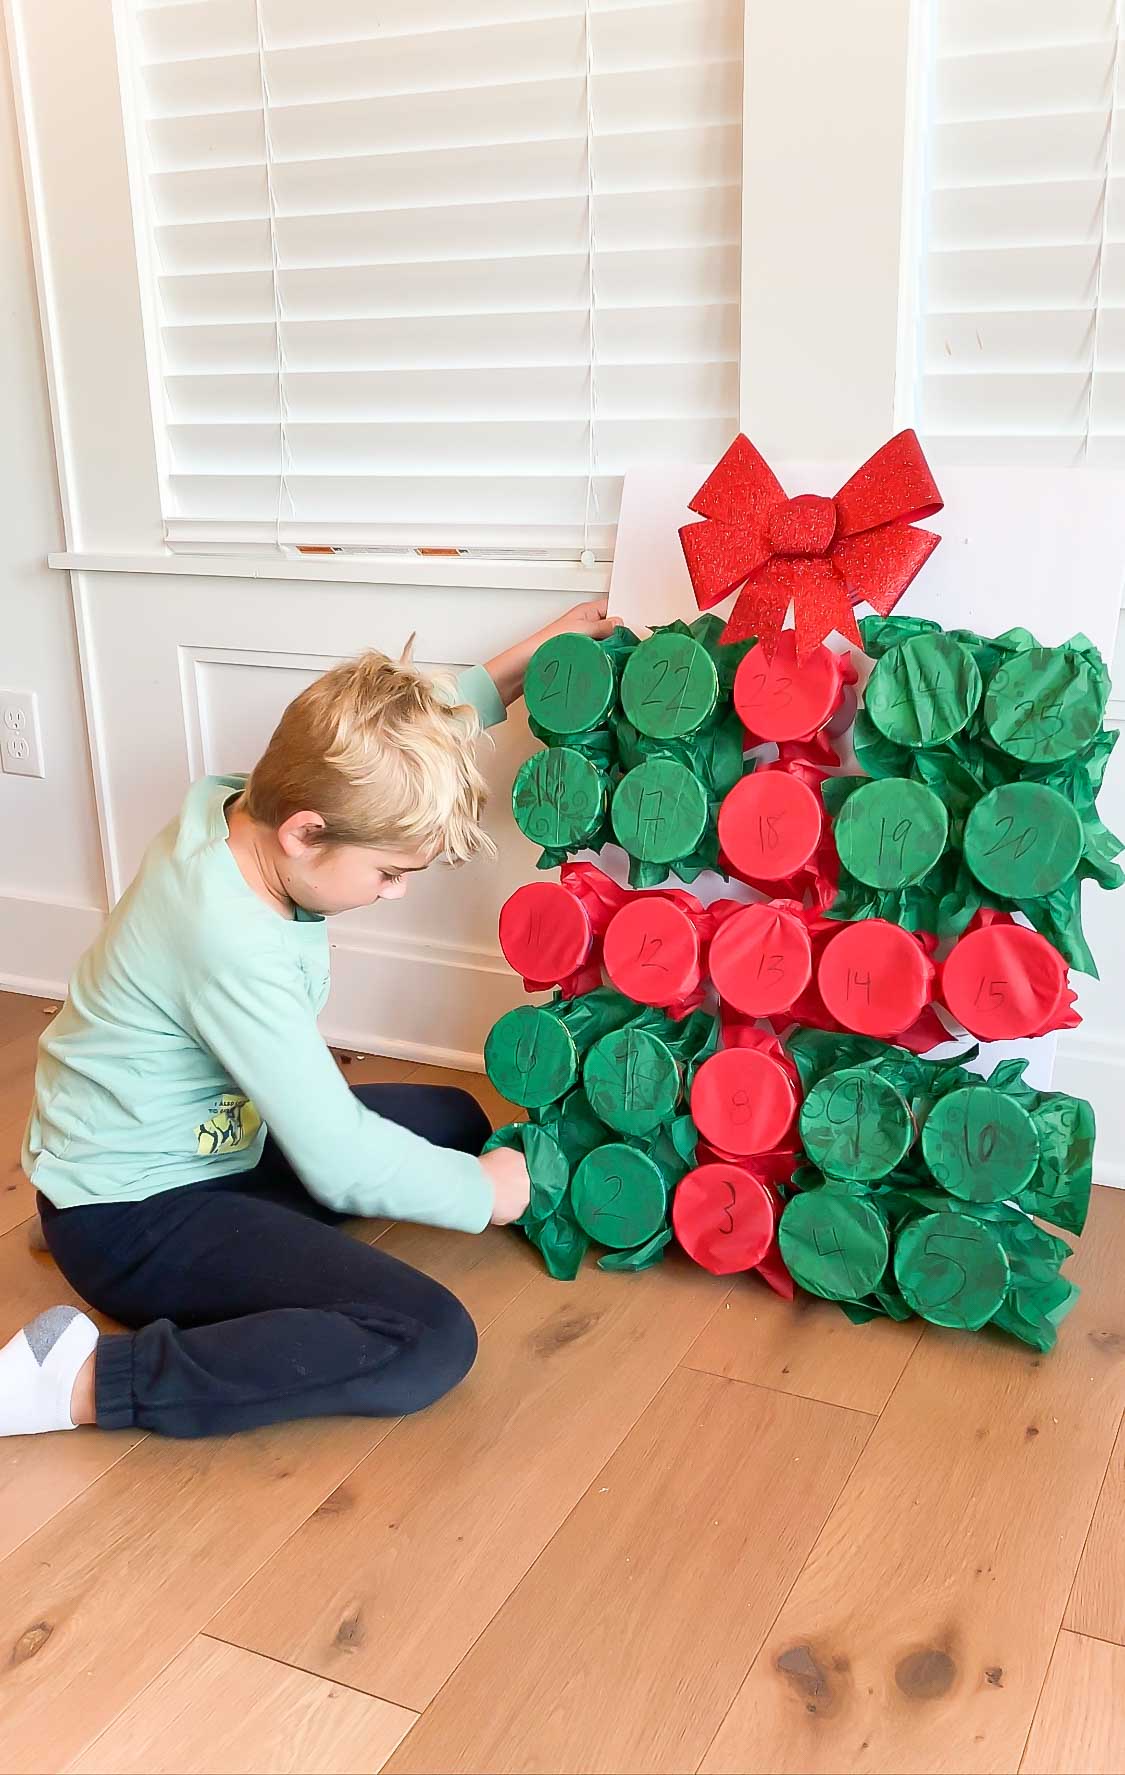
1 – Make Your Punch Board
To make the advent calendar, you have to first start by making the actual punch board. To do that, lay out your cups on a white board to figure out your design and the number of cups you need.
I knew I wanted to do a cup for every day leading up until Christmas (including Christmas), so I did 25 cups – five rows of five cups each. You could also do a 4×6 or 6×4 design if you wanted to only do 24 days.
Once you've figured out your design, hot glue the bottom of a cup and place it hot glue side down on the board at the bottom of your design.
Keep going until you've added all of your cups to the board. Make sure there is enough space between the cups so that you'll be able to add the tissue paper on later.
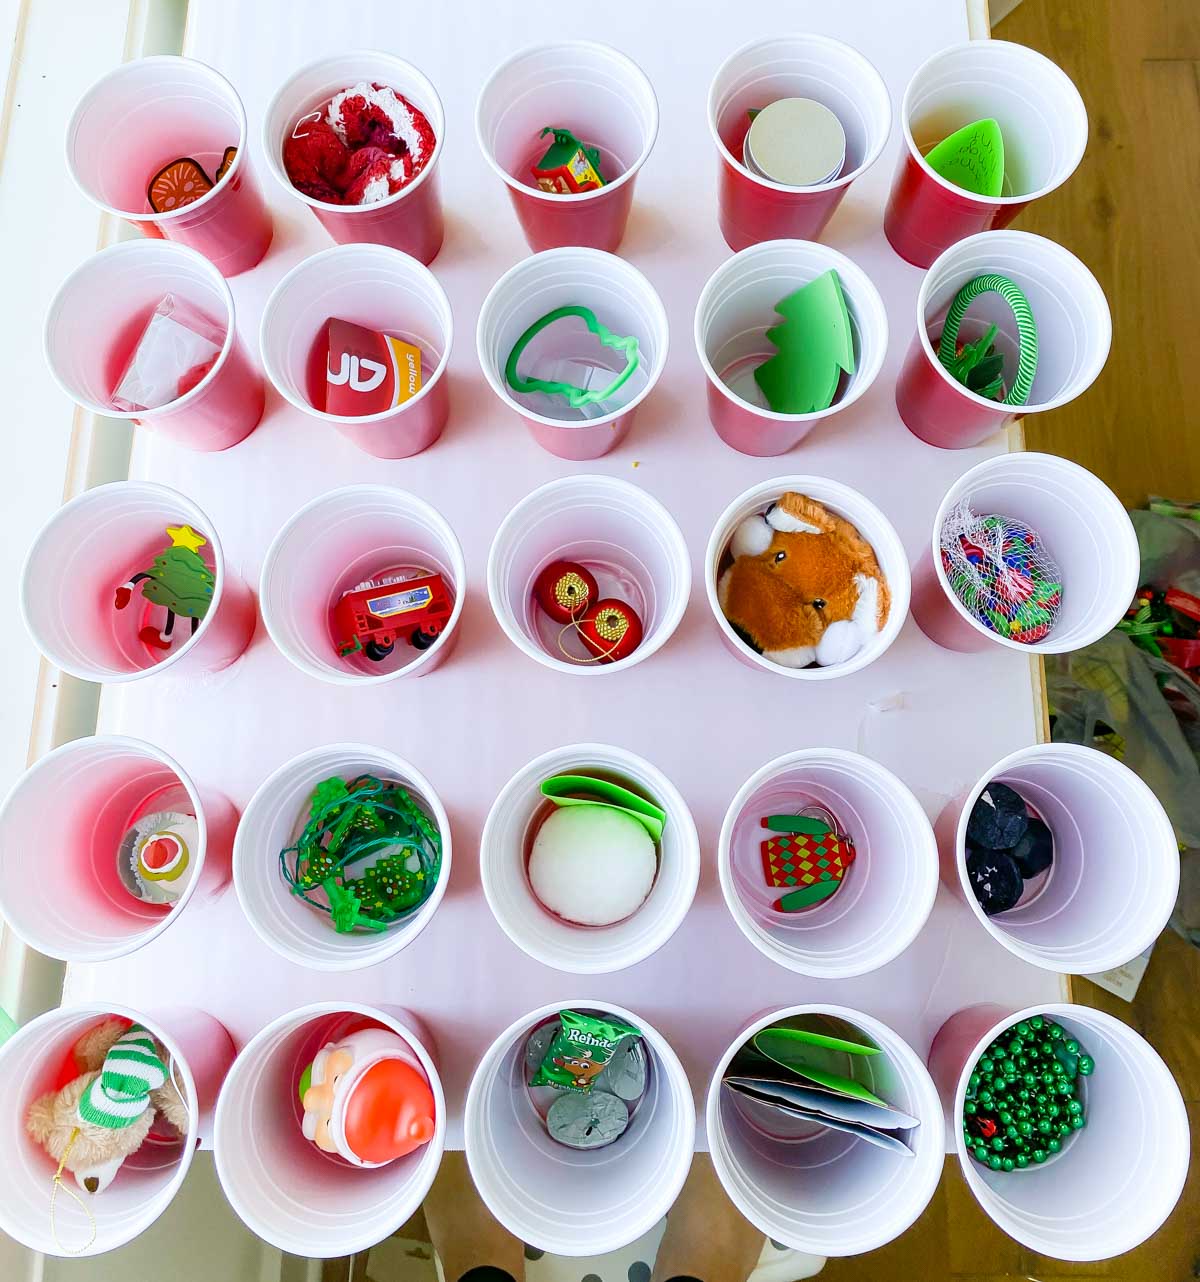
2 – Fill Your Cups
The second step is to fill all of those cups with whatever you want to include in your advent calendar.
You can do one of three things (or really whatever you want, but these are three ideas to get you started):
- Fill each cup with a small gift or treat of some sort
- Fill each cup with one of these Christmas activities that you can do together
- Fill each cup with a variety – some with treats, some with activities, some with gifts. Or do it all!
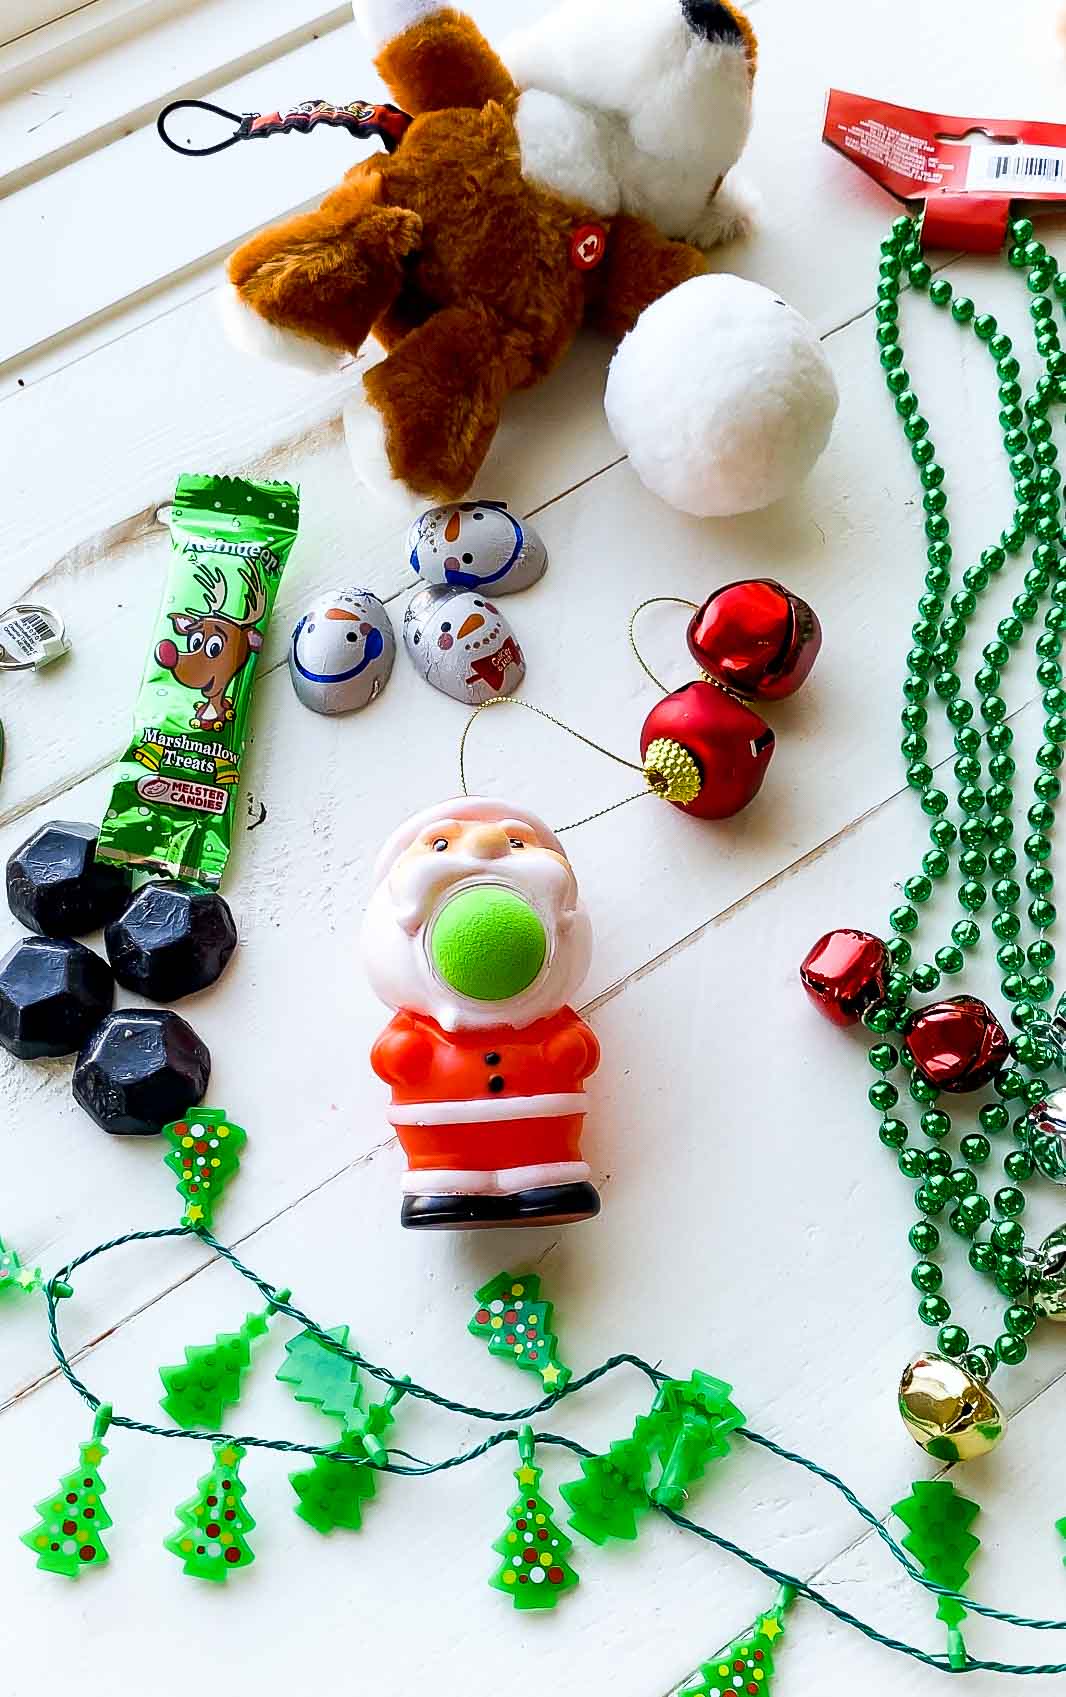
I did the latter – a combination of activities, treats, and smalll toys that I picked up at Dollar Tree and Target Dollar Spot.
Just keep in mind that if you're putting activities in the cups, you need to make sure you are available to do those activities on those days.
I like to specifically put activities into cups that correspond with days we already have things planned. Like for instance, we are going to see the new Spiderman movie when it comes out on December 17th, so I put movie tickets into the cup for that day and will tell the boys we are going when they open the cup for the day.
I also like to put in activities along with an object that corresponds with the activity so they aren't just pulling out a piece of paper.
For example, we always do a snowball fight with these fake snowballs (the same ones I used for my Christmas games!). So I put one of the snowballs along with a card that says snowball fight into the cup for that day.

I also always do a Christmas scavenger hunt on Christmas morning so that card and the clue from this Christmas scavenger hunt is what they'll pull out on December 25th.
Christmas activity ideas
If you need ideas of Christmas activities to put inside, these are some fun ones for any age!
- Saran wrap game
- Candy cane game (we did an entire candy cane Olympics last year!)
- Reindeer hunt
- Christmas would you rather
- Christmas lights scavenger hunt
- Roll a Christmas tree game
You can see everything I put in mine below! If you have questions about something, leave me a comment and I'll do my best to answer!
3 – Cover Your Cups
Lastly you need to cover your cups so that you have something to punch through.
Start by folding one color of your tissue paper in half and cutting it in half again so you have small squares.
Then repeat that with the other color. If you're doing the present like I did, you're going to need 10 pieces of one color (the ribbon) and 15 of the other color.
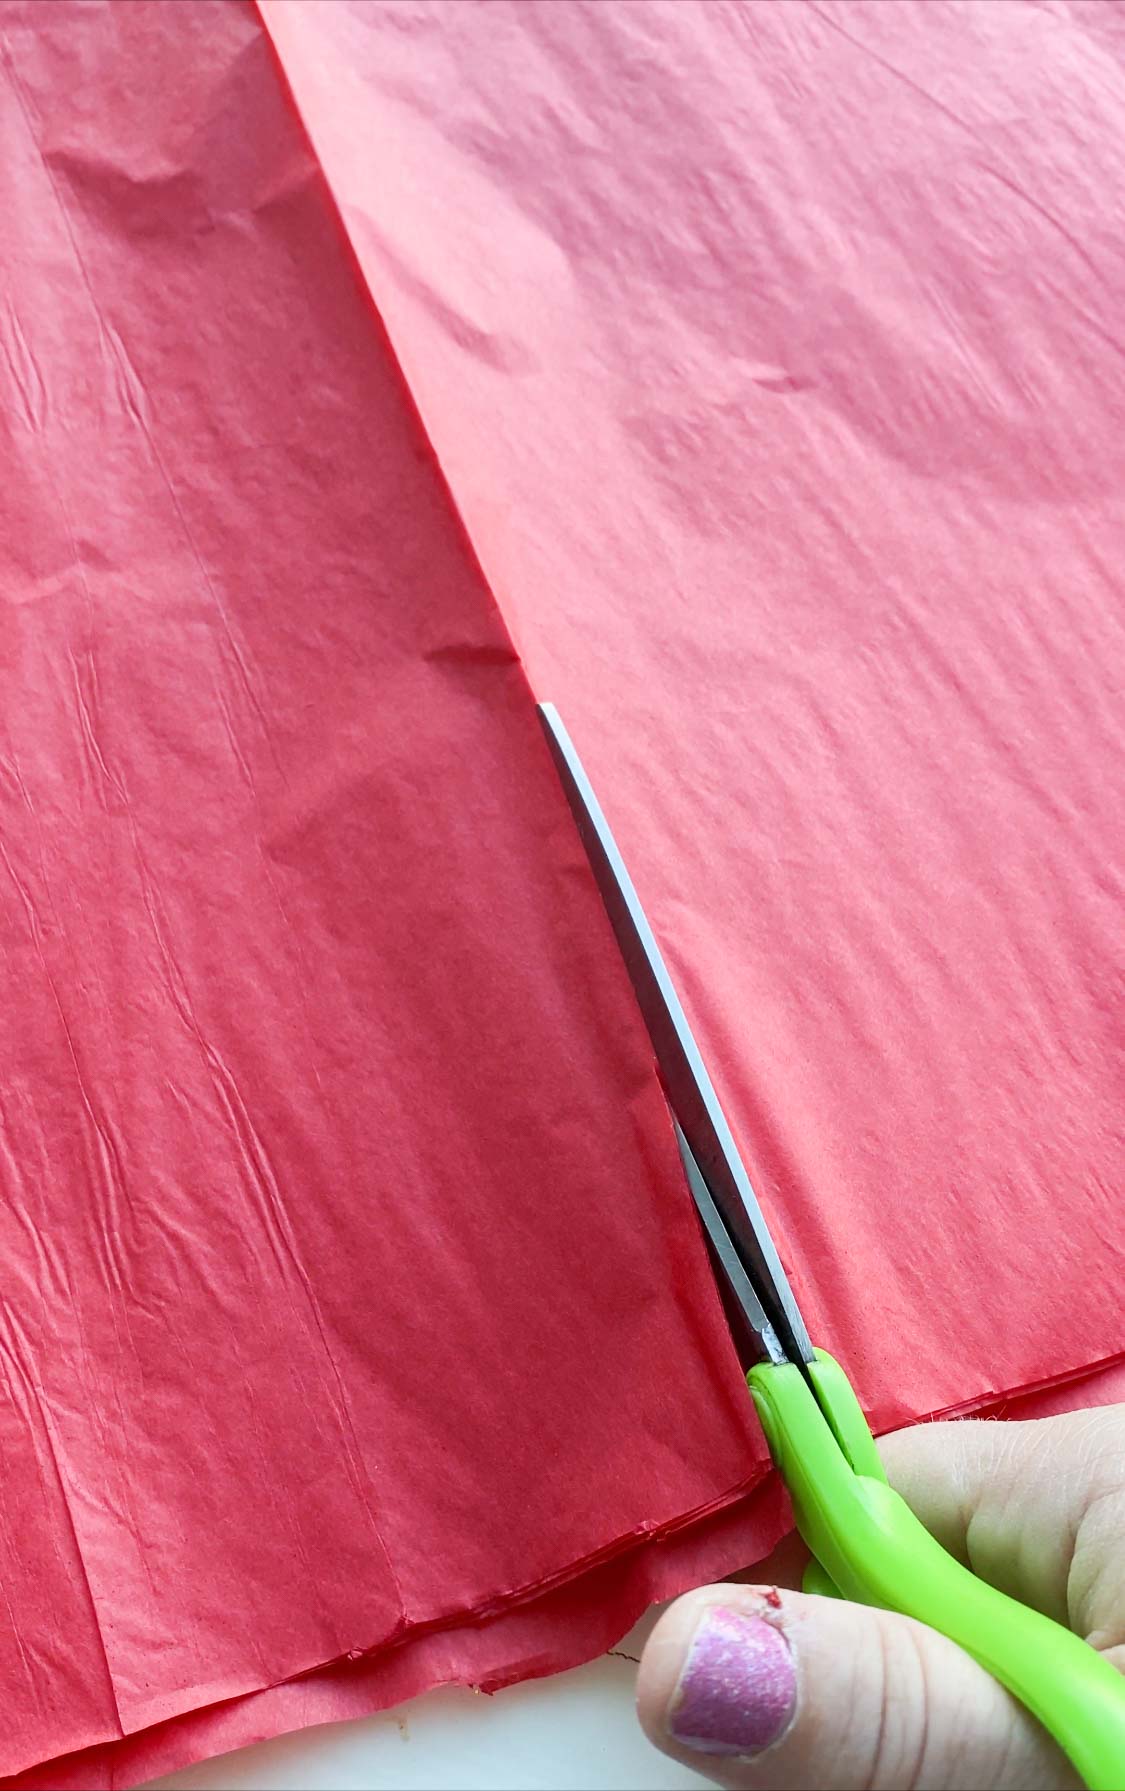
You can make it even easier by cutting all of your tissue paper at once. Since the tissue paper is so thin, you can just stack the pieces together and cut them once in half then in half again. Easy as can be.
The pieces of tissue paper don't need to be precise, they just need to be a good size to fit over the cups.
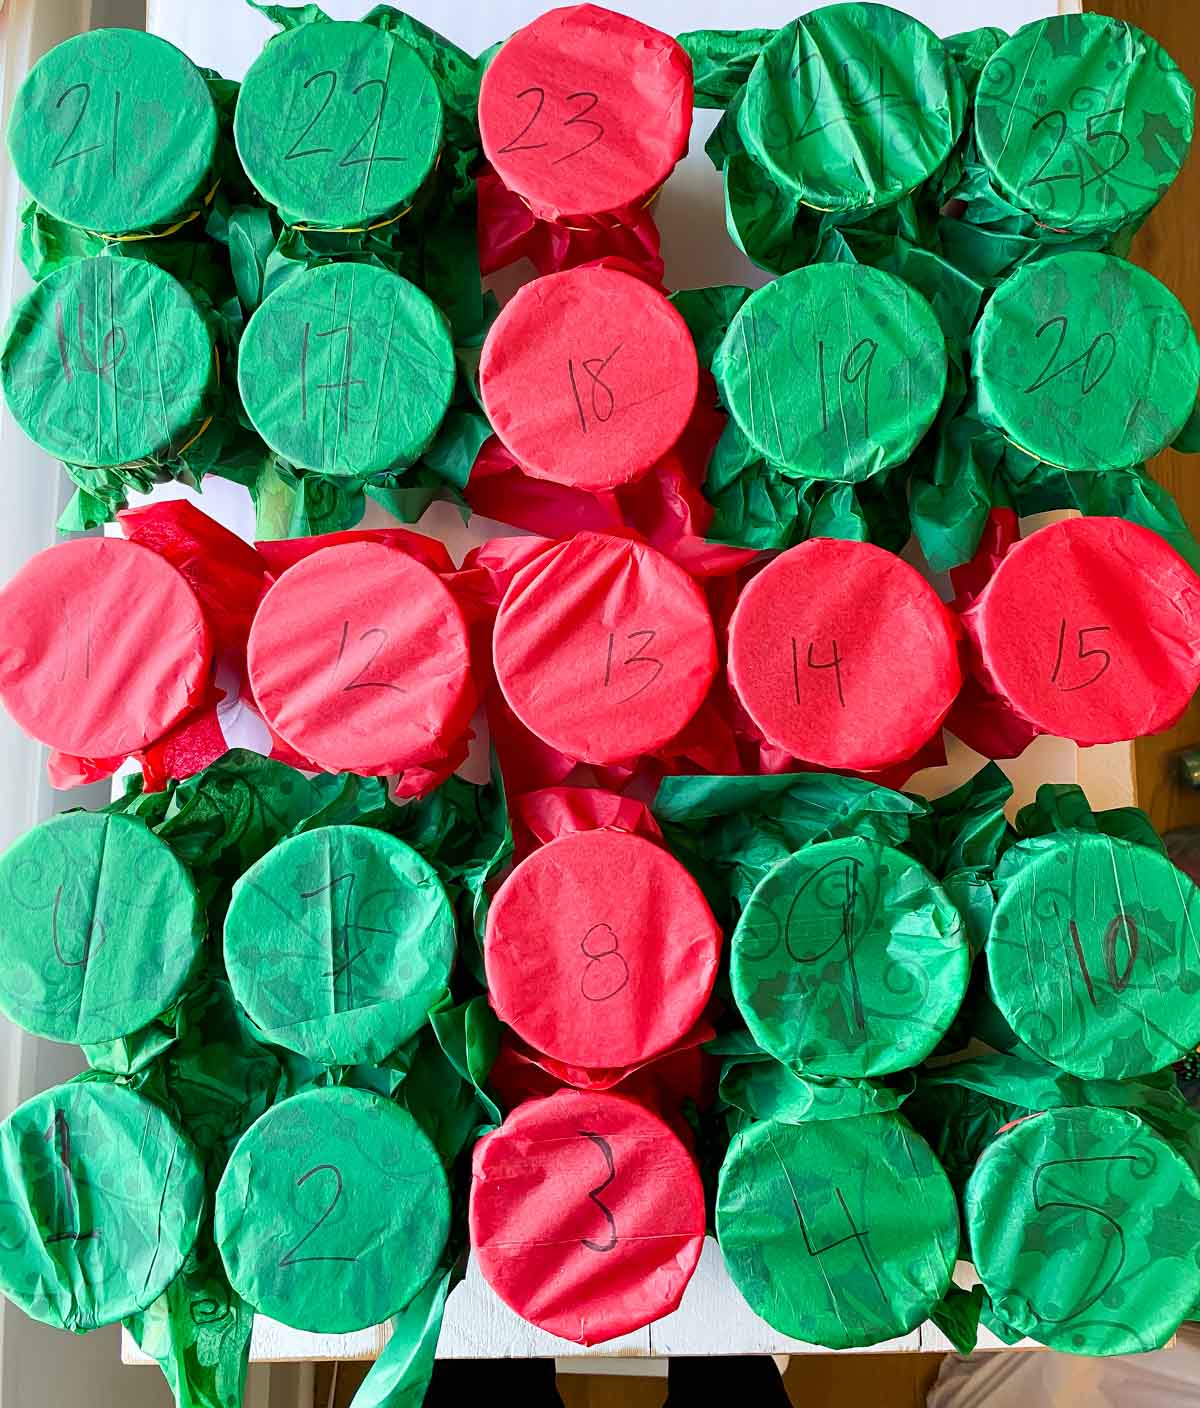
Once you have all of your tissue paper cut, use a black Sharpie to write numbers on the center of the pieces of the paper. I did 1 to 25 but you could do anything you want.
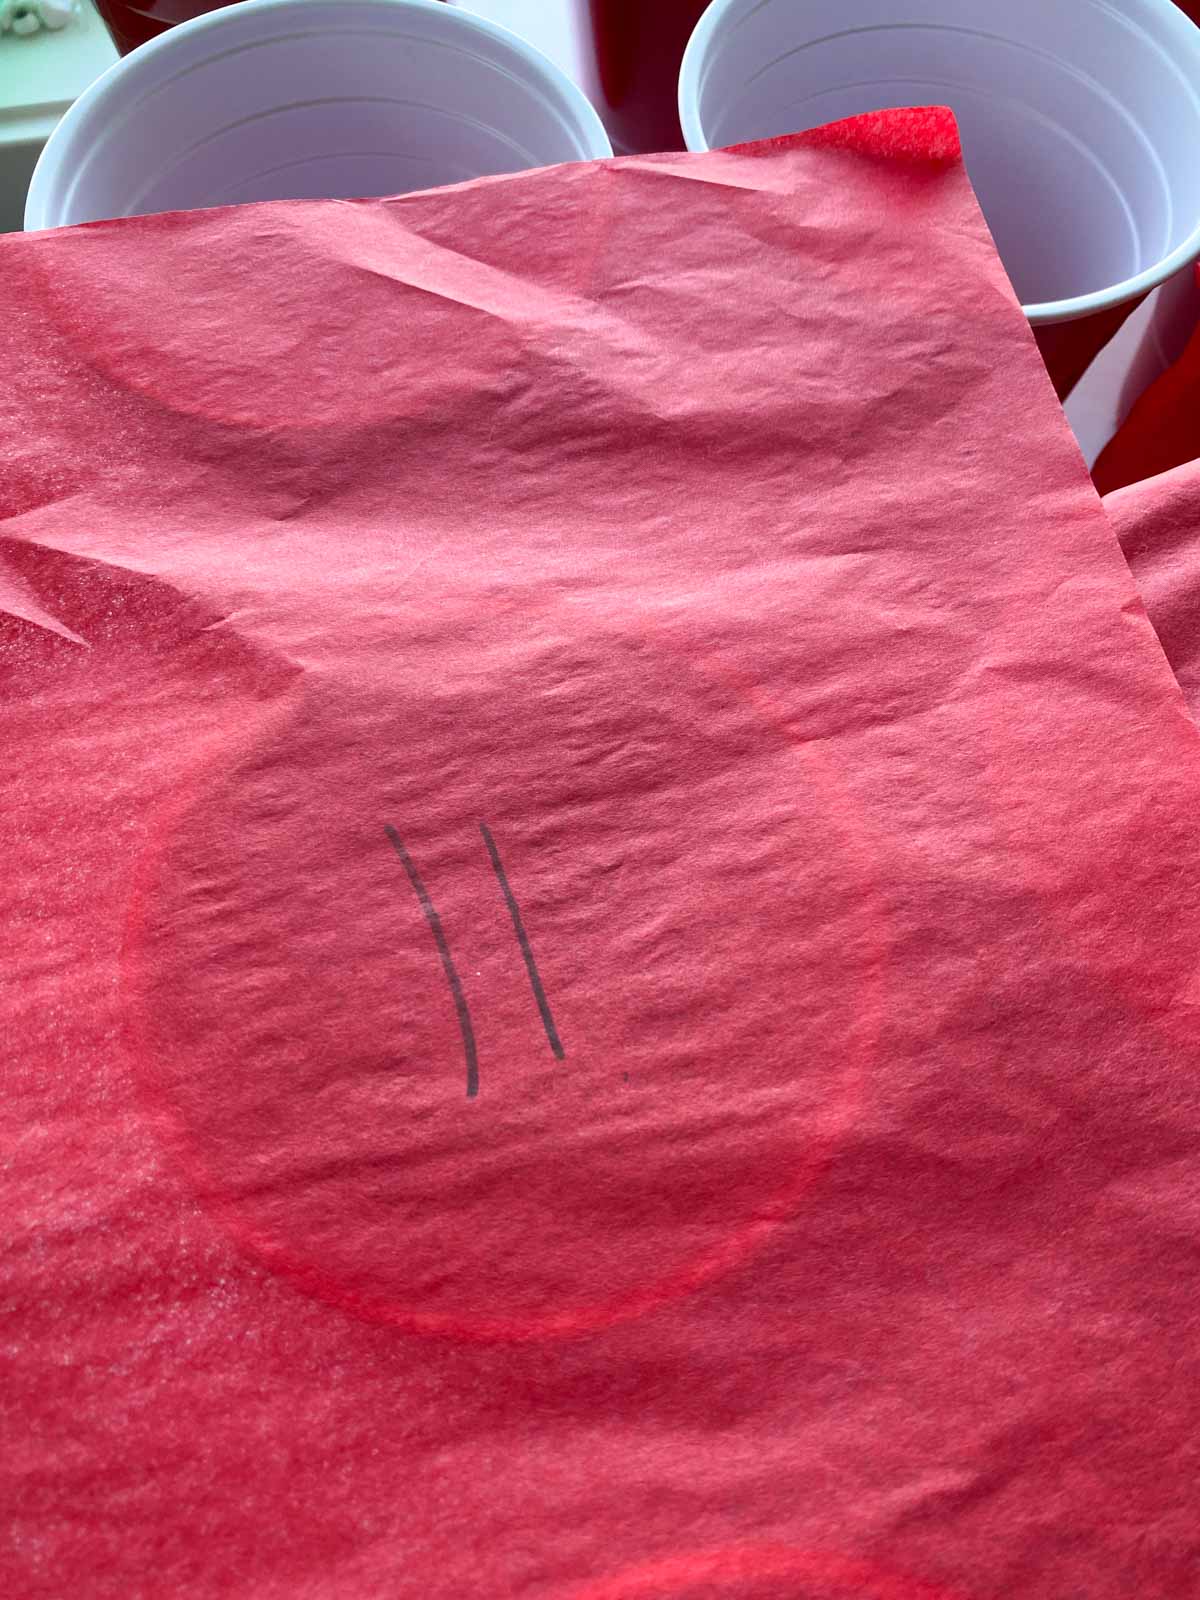
Wrap a rubber band around the tissue paper and cup to secure it to the cup. This is much easier if you use thin rubber bands rather than the thick ones.
Put one color tissue paper down the middle row of your cups and one down the center horizontally and do the other color for the other cups so it looks like a present with a ribbon.
4 – Add a Bow
If you want to make it look more like a present, you can put a bow on top like I did.
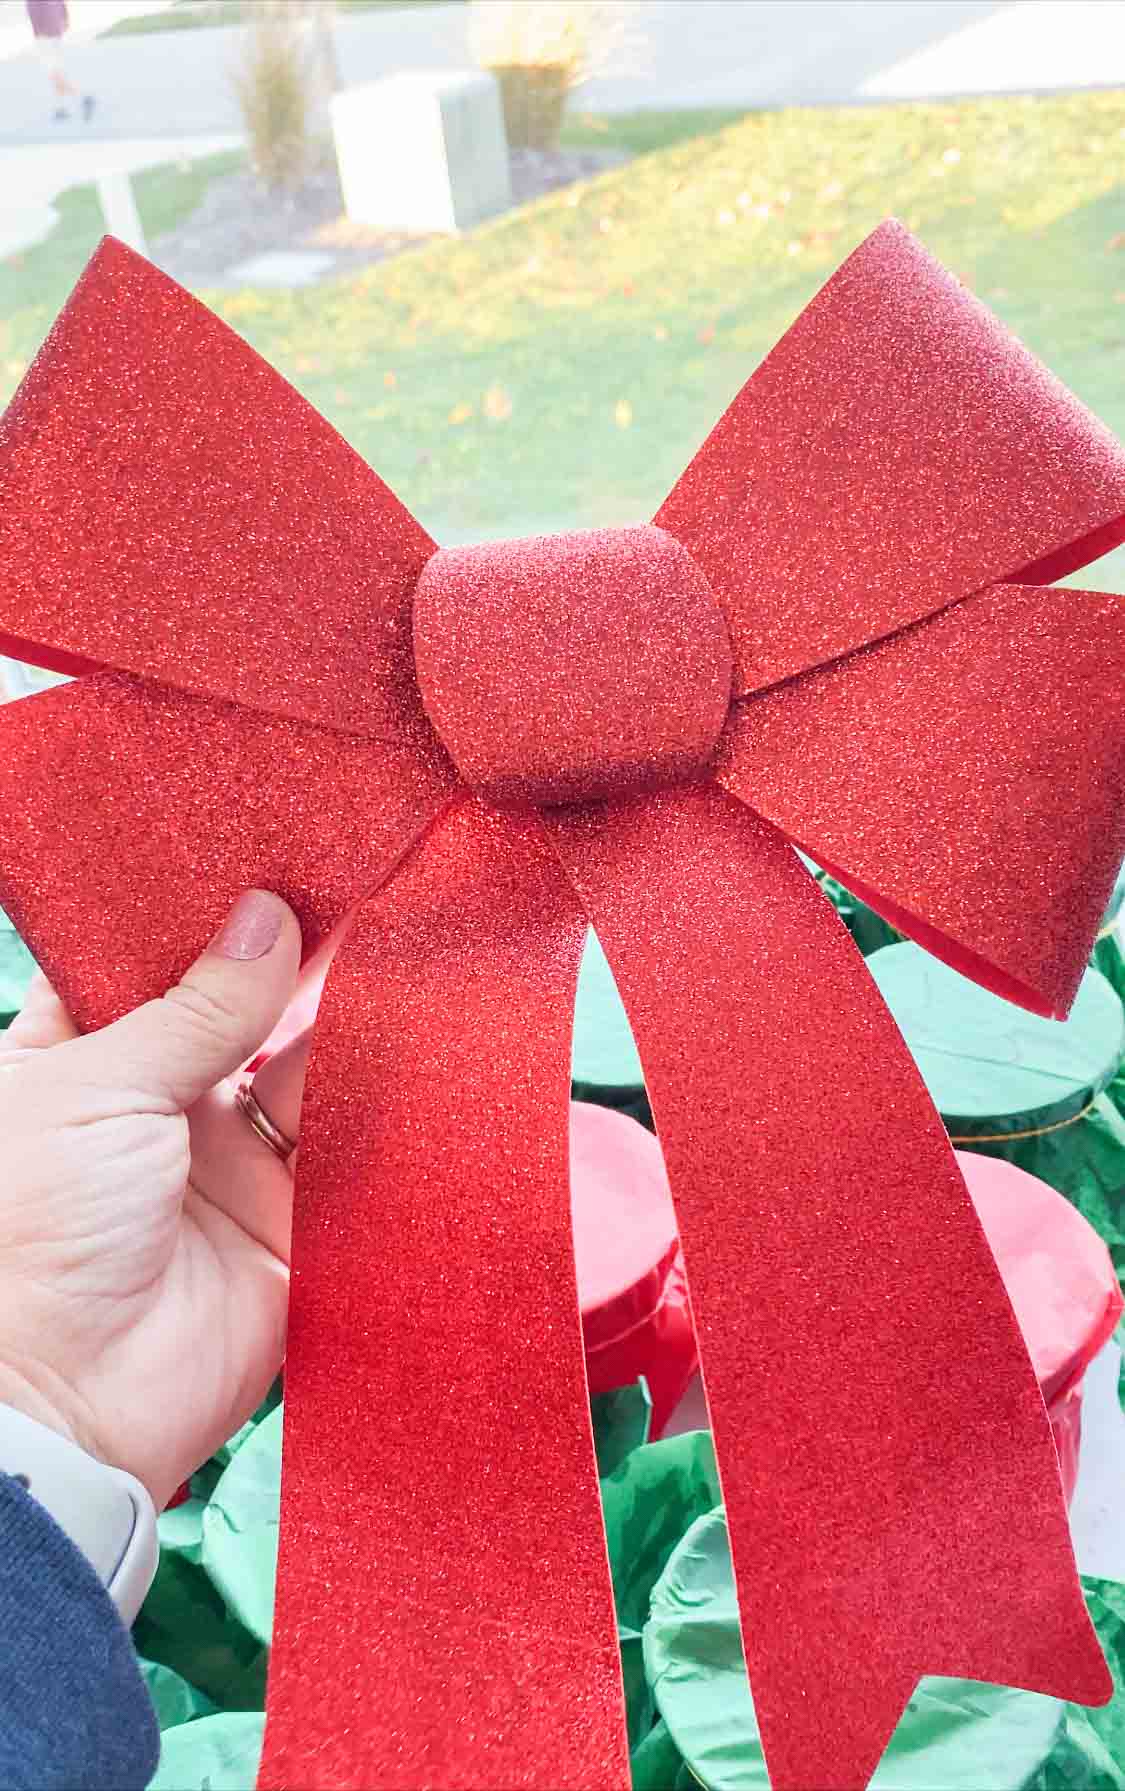
Hot glue a cup, with the bottom of the cup facing up, just a bit above your top row of cups in the center.
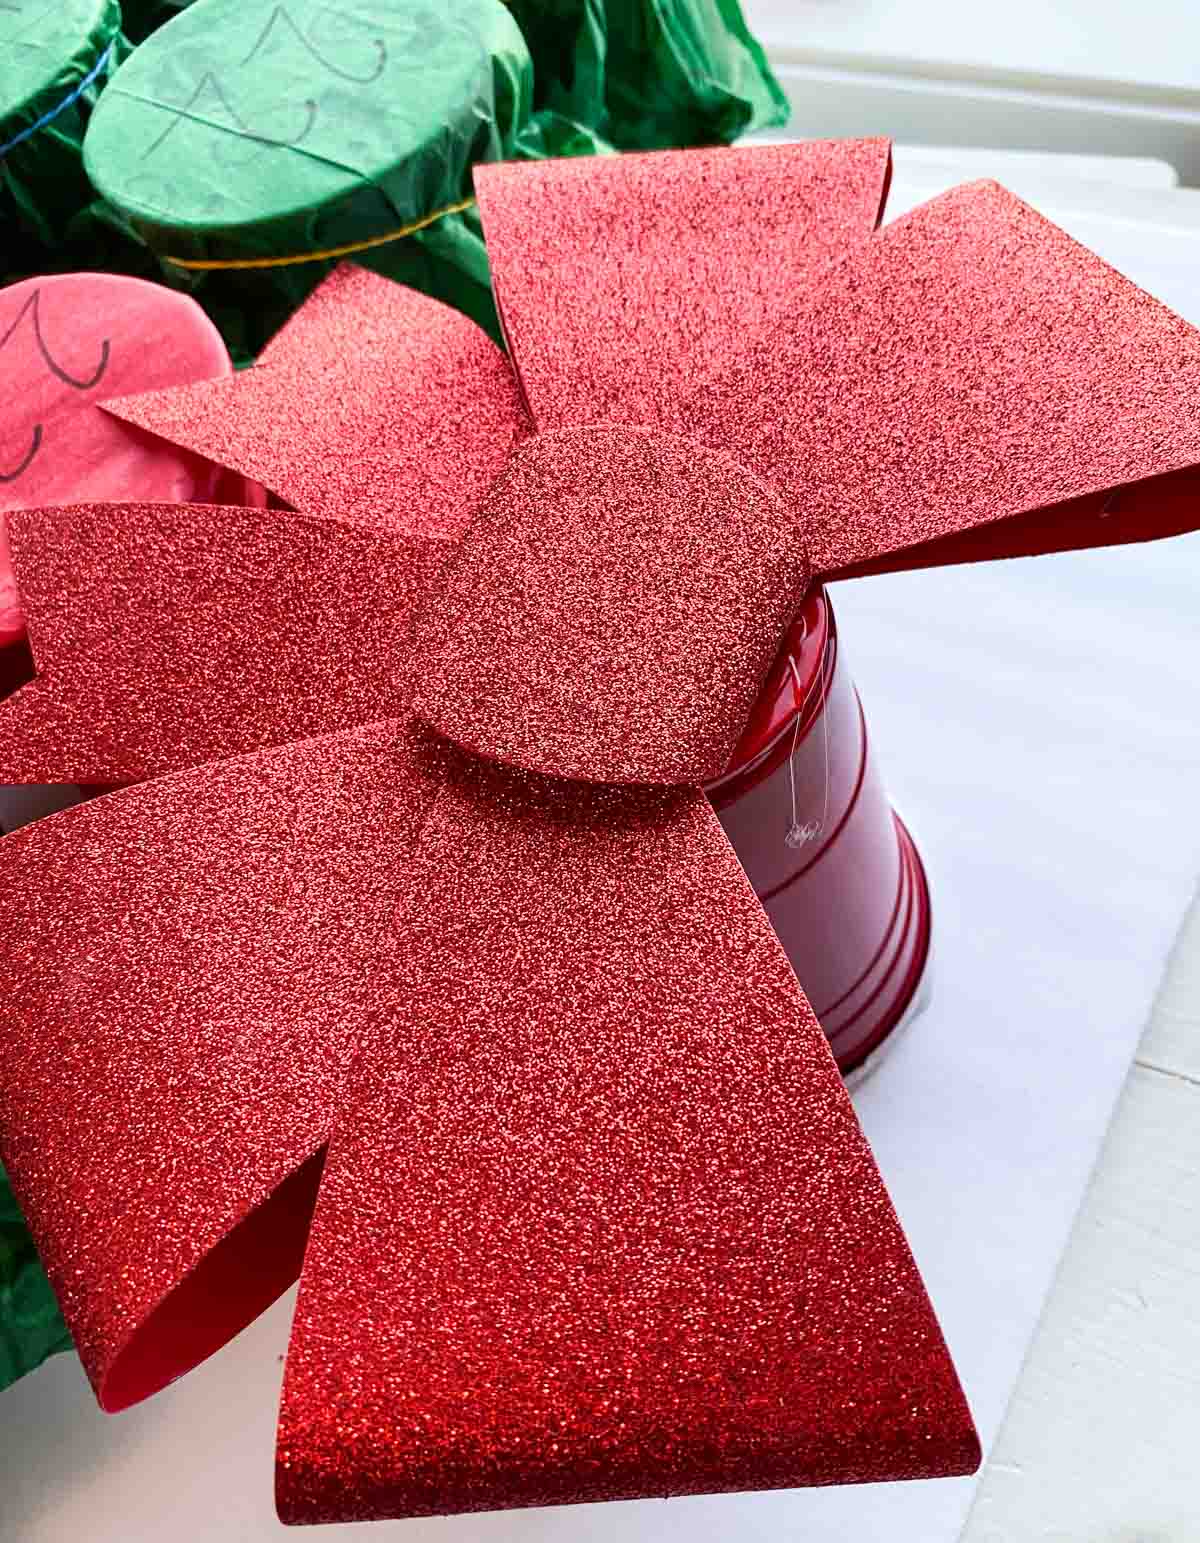
Hot glue a large bow right on top. Then cut the ends of the bow ribbon as necessary so you can get to the cups for punching still.
And that's it, your DIY advent calendar is done and ready to use!
All you need to do now is wait until the first day of December (or whatever you're using it for) to let the countdown begin!
When you're ready to start the advent calendar, you can either start at 1 and go up to 25 or start at 25 and go down to 1. I designed mine to start at 1, but I know some people prefer to count down from 25 to 1.
Then punch away!
DIY Advent Calendar Gift Ideas
If you need ideas of things to put in the advent calendar, I've included a handful of ideas below. At the end of the day, it's fun just to get something each day so they don't need to be extravagant! And make sure they fit in the cups!
Advent Calendar Gifts for Kids
Kids are the easiest because they're most often happy with getting anything. Just walk through Dollar Tree, Target, or Walmart and grab things that fit in the cups and are inexpensive. Or go with the activity route I mentioned before. Treats, little toys and favors, $1 bills, Christmas activities are all a good option.
Advent Calendar Gifts for Teens
Teens are probably the hardest bunch to not only find advent calendar gifts but just to buy for in general. Some things I can think of that are small and would fit in the calendar include:
- Money/gift cards
- Movie tickets
- Fidget toys
- Trading cards like basketball, baseball, Pokemon, etc.
- Small card games
- Little figurines
- Bath bombs/soaps
- Little packs of gourmet foods like sauces, snacks, etc.
- Ornaments, keychains, or other hanging things
- Anything unique that fits their interests (TV shows, video games, sports, etc.)
- Anything to use with electronics – extra chargers, cases, covers, etc.
- Makeup and jewelry
- Stress balls or calming things
- Pins, patches, stickers
Advent Calendar Gifts for Adults
If you're doing this for an adult, my guess is that you probably know that adult pretty well and want to get them a fun gift, kind of like I did with the best 30th birthday gifts for my husband!
I'll give you some ideas, but I recommend just walking through a store or looking online and grabbing small things that make you think of them. Or things that they'd enjoy and wouldn't buy for themselves. To give you a few ideas:
- Gift cards (I wouldn't do money simply because it feels lazy for adults)
- Makeup, lip balms, cosmetic type stuff
- Socks, gloves, hats, or any other clothing item
- Memorabilia or things from their favorite shows, movies, artists
- Coupons for time together (I did this for my 8th anniversary gift and it was a huge hit)
- Their favorite snacks or mini drinks
- Bath bombs/pamper items
- Movie/concert/show tickets
- Lotto tickets
- Mini bottles of sauces, drinks, snacks, etc.
For adults (and teens), you could really make this their entire Christmas present instead of doing a bunch of little things on Christmas day, just fill this DIY advent calendar with gifts all month long!
DIY Advent Calendar FAQs
Should I make one per person or can they share?
This is totally up to you and who you are making these for. If you're doing a calendar full of activities for the entire family and your kids are mature enough to take turns punching out holes, do one. If you're doing gifts and treats, I recommend making one per person so they each get their own. That's part of the fun of advent calendars!
More Christmas Ideas
If you like this DIY advent calendar, you'll love these other fun Christmas ideas!
- Christmas party themes – if you're looking for new Christmas party themes, you're in luck! 25 of the best right here!
- Christmas bingo – a set of adorable Christmas bingo cards, great for playing in the classroom or at any party! Or mix it up and try Christmas movie bingo or Christmas music bingo instead!
- Christmas trivia printable game – tons of fun Christmas trivia questions you can either print and ask or just ask!
- Christmas Family Feud – can you figure out what the audience thinks is the most popular Christmas song? Find out in this fun Christmas version of the popular game show! Like game shows, this Christmas danger words game might also be fun!
- Dice gift exchange – this is the most hilarious gift exchange ever, always fun!
- 1 foam board or large piece of cardboard
- 26 plastic cups of any color
- 7 pieces tissue paper 4 of one color and 3 of another, all cut into 4 squares (total of 25 pieces)
- 25 rubber bands
- 25 prizes
- large bow
-
Start by placing your cups on the foam board wherever you want them to go.
1 foam board or large piece of cardboard, 26 plastic cups of any color
-
Once you've finalized your layout, hot glue the bottom of each cup and immediately place it in its spot on the board. Repeat this until you have a board full of cups with the open part of the cup facing up.
-
Add a prize into each of the cups.
25 prizes
-
Cut your tissue paper into squares so you have 25 total squares. Number your pieces of tissue paper 1 to 25.
7 pieces tissue paper
-
Once your tissue paper is ready, carefully place your first piece of tissue paper on top of a cup. Use a rubber band to secure the tissue paper around the edges of the cup, pushing the issue paper down so that the number is as close to the center of the cup as possible.
25 rubber bands
-
Hot glue one more cup, this time with the bottom facing up, at the top of the board in the center row. Then hot glue a large bow to the top of the cup to add a bow to your present.
large bow
-
Set the advent calendar up and you're ready to go.
Make room in your storage room or garage for this because you can reuse it over and over again by simply refilling with gifts and replacing the tissue paper!
Make one advent calendar per person unless they're mature enough to take turns punching and share what's inside.
brutonbeirsinglat.blogspot.com
Source: https://www.playpartyplan.com/diy-advent-calendar/